I started playing with OpenMediaVault (OMV) years ago, but never fully configured it or documented the steps needed to get it up and running. Just after one SD failing later, I decided to write down everything, maybe it can be useful to someone.
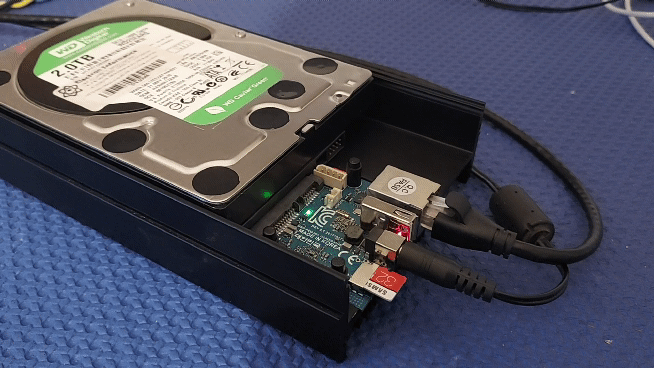
Hardware side, I’m using the ODROID-HC2 from Hardkernel. It’s a great little NAS device, the only downside are import taxes from Korea to Europe. If you are interested, remember to choose wisely between resellers.
Steps listed below should be the same for any other single-board computer.
Step 1. Armbian installation
Go to armbian.com and download Armbian Buster (kernel 5.4.y). Avoid the desktop version.
Flash it with Balenaetcher (or your favourite tool) to a MicroSD Card. Look here for suggestion.
Insert the SD, connect the network and boot up the ODROID-HC2
After some minutes, you should see a new IP in your LAN. There are several ways to detect it. You can look in the DHCP table of the router, use nmap -sn 192.168.1.0/24, or WakeMeOnLan utility.
Connect to the ODROID-HC2 (ssh command on Linux, PuTTY on Windows) with root/1234. Follow on screen instructions, change default password as you like. At the end, execute:
sudo apt-get update
sudo apt-get upgrade
sudo reboot
Step 2. OMV Installation and configuration
Usually I don’t trust executing random scripts from the internet, but in this case let’s give some trust to the OMV community. Connect to the ODROID-HC2 and simply run:
wget -O - https://github.com/OpenMediaVault-Plugin-Developers/installScript/raw/master/install | sudo bashAfter some minutes you can logon to the web interface with admin/openmediavault .
There is a lot to be configured: ip address, timezone, samba workgroup, users and so on, but this can be easily done following the official guide. For now let’s focus on create share with snapshots/shadow copy readable by windows clients.
Go to Storage > File System, format your disk with BTRFS and mount it.
Note: Of course formatting will delete all your data. This is considered normal in a new installation.
Note2: I chose BTRFS because it’s the easy way to support snapshot with OMV out-of-the-box
Reboot and go back to the SSH session. The reboot is to make sure the mountpoint does not change.
Back to the ssh session, let’s find the mountpoint for the BTRFS partition with the command
mount | grep btrfsOutput will be like:
/dev/sda1 on /srv/dev-disk-by-id-ata-WDC_WD40EZRZ-XXXXXXX_WD-WCC7XXXXXXXX-part1 type btrfs (rw,relatime,space_cache,subvolid=5,subvol=/)
Take note of the /srv/dev-disk… part.
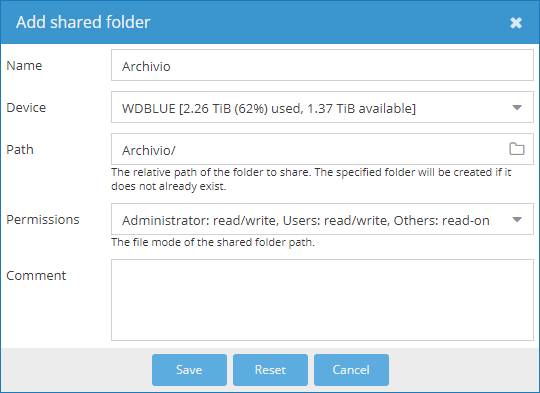
Now create a subvolume that will be used as a share. From now on, every step must be reapeated for each share you need. Let’s take “Archivio” for example.
btrfs subvolume create /srv/dev-disk-by-id-ata-WDC_WD40EZRZ-XXXXXXX_WD-WCC7XXXXXXXX-part1/ArchivioNote: in the only one guide I found, they suggest using “@Archivio” for subvolume name. It’s not mandatory, so I skipped (reference on the OMV forums, here).
Let’s create also a “.snapshot” subvolume to contain all the snapshots:
btrfs subvolume create /srv/dev-disk-by-id-ata-WDC_WD40EZRZ-XXXXXXX_WD-WCC7XXXXXXXX-part1/Archivio/.snapshotsNow, using the web interface, go to Access Rights Management > Shared Folders and add new share, pointing at the relative subvolume. It’s a good idea to configure users and permission while you’re here.
Now go to Services > SMB/CIFS > Shares and add the share. Configure as below:
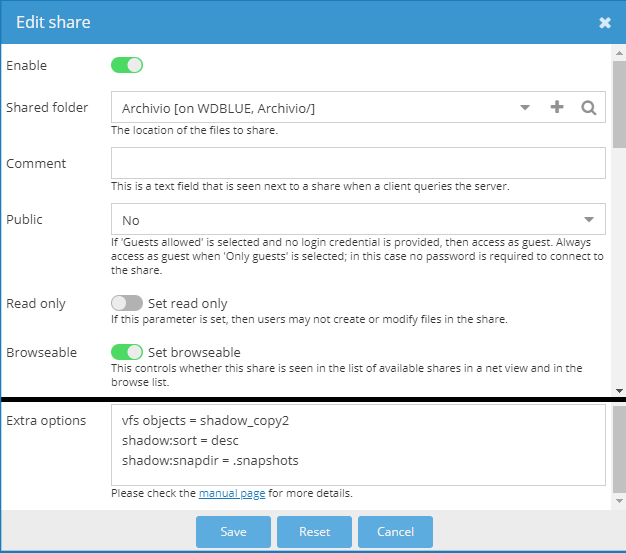
It’s very important to write this in the Extra options:
vfs objects = shadow_copy2
shadow:sort = desc
shadow:snapdir = .snapshots
shadow:localtime = yes
Step 3. Snapshot scheduling and retention
OMV lacks (for now) any sort of automatic snapshot management. I ended up with these two scripts that I wrote. They are based on the work of this french guy and this forum post. Sadly his scripts don’t work on modern system.
You can create and upload with WinSCP, or just vi an empty file and copy/paste all the code. The first one is called take-snap.sh and the second one is purge-snap.sh
Remember to adjust subvolume path to reflect your system, and also the days for the snapshot retention.
#!/bin/bash

#Please adjust to the correct SUBVOLUME and SNAPSHOTS folder.
PATHSUBVOL="/srv/dev-disk-by-id-ata-WDC_WD40EZRZ-XXXXXXX_WD-WCC7XXXXXXXX-part1/Archivio"
PATHSNAP="$PATHSUBVOL/.snapshots"

#Name of the snasphot will be like: @GMT_2021.09.09-22.06.07
#It's the standard for vfs_shadow_copy2
SNAPNAME="`date +@GMT-%Y.%m.%d-%H.%M.%S`"

btrfs subvolume snapshot "$PATHSUBVOL" "$PATHSNAP/$SNAPNAME"
#!/bin/bash

#Please adjust to the correct SUBVOLUME and SNAPSHOTS folder.
#Snapshots are expected with a name like: @GMT_2021.09.09-22.06.07
PATHSUBVOL="/srv/dev-disk-by-id-ata-WDC_WD40EZRZ-XXXXXXX_WD-WCC7XXXXXXXX-part1/Archivio"
PATHSNAP="$PATHSUBVOL/.snapshots"

#Please adjust the days to keep.
AGELIMIT=$(date -d "14 days ago" "+%s")

######################################

#Search all the snapshots
SNAPSHOTS=$(ls "$PATHSNAP" | grep GMT)
for SNAP in $SNAPSHOTS
do
        echo "Processing $SNAP:"

        #Need to adjust date format for the 'date -d' command to understand - delete first 5 chars @GMT_
        INPUT=$(echo "$SNAP" | sed -e 's/^.....//')
        #Extract left part 2021.09.09 and replace . with -
        P1=$(echo "$INPUT" | awk -F '-' '{print $1}' | sed -e 's/\./\-/g')
        #Extract right part 22.06.07 and replace . with :
        P2=$(echo "$INPUT" | awk -F '-' '{print $2}' | sed -e 's/\./\:/g')
        echo "\tReadable date is: $P1 $P2"

        #Convert in unix timestamp for comparison
        SNAPEPOCH=$(date -d "$P1 $P2" "+%s")
        echo "\tUnix timestamp is: $SNAPEPOCH"

        #Compare with AGELIMIT unix timestamp
        if [ $SNAPEPOCH -lt $AGELIMIT ]
        then
                echo "\tSnapshot too old."
                btrfs subvolume delete "$PATHSNAP/$SNAP"
        else
                echo "\tOk to keep."
        fi
done
exit
Let’s assume they are in /home/frab/ folder. In the web interface, select System > Scheduled Job, and add two tasks referencing the full path:
sh /home/frab/take-snap.sh > /dev/null 2>&1
sh /home/frab/purge-snap.sh > /dev/null 2>&1
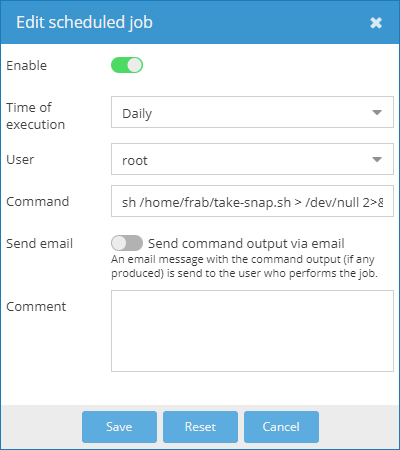
Let’s select daily for now.
That’s it. The snapshots will be kept only for the days you need and they will be visible by Windows clients.
Please let me know in the comments if I left something out or if something does not work. Remember this article was wrote on September 2021.
Some useful readings:
- https://docs.armbian.com/User-Guide_Getting-Started/
- https://wiki.omv-extras.org/doku.php?id=installing_omv5_armbian_buster
- https://openmediavault.readthedocs.io/en/5.x/new_user_guide/newuserguide.html
- https://forum.openmediavault.org/index.php?thread/7331-guide-windows-previous-versions-and-samba-btrfs-atomic-cow-volume-shadow-copy/
- https://blog.info16.fr/index.php?article69/mise-en-place-des-snapshots-avec-btrfs-et-open-media-vault